If you need a desktop search software for Microsoft Windows, try Locate32. A free, open-source program that works faster and better.
Introduction: Locate32 is a desktop search tool that works great. No dependencies such as Java, .NET framework or anything else. All you have to do is to download the application, extract the contents of the archive in a folder and that's it. You don't have to install the program or anything like that. It is inspired from Unix environment where you use the standard command "updatedb" before searching for files. How much does it takes to perform a search? Well, let's say that it's the fastest desktop search utility that I ever tested.
Quick Guide: The application is easy to use so there is no learning curve needed for basic search operations. The first thing to do is to create a folder on your computer. I've made a folder right on my Desktop. Download Locate32 and copy the archive in that folder. Extract the archive using your favourite archive manager.

After successfull extraction, you should see several files and folders. Look for a file named "locate32.exe" and open it.

The application will start right away and it will look like in the following image. That's the main program interface: clean and intuitive.

Obviously, when you can run the program you may be tempted to search for something. If you do that, you will notice an error message saying: "no results (error with database default)".

It doesn't work that way. The first thing to do, right-after running the program for the first time is to create a database. To do that, go to "File" and choose "Update Databases" or press "F9" key.

Don't worry, it won't take long. If you have a large hard drive, it should take a couple of minutes. In the meantime you can see that the program is updating. From his main interface and a small yellow window.

Right-after the update, you should type a word and the results will be displayed in program interface. In this example, I searched for "Locate32" word and as you can see, the results were displayed in the same window. Not to mention that everything happened instantly.

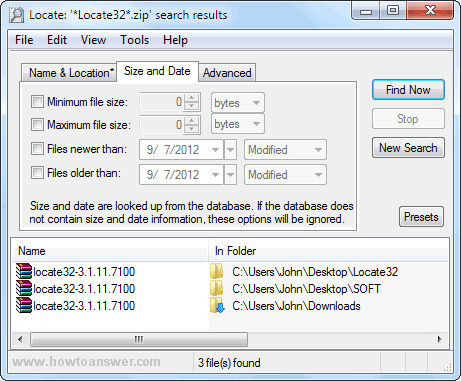
Let's play a little bit. If I would want to search the keyword "Locate32" and find only zip files, I would have to mention this at the "Extensions" section (below). The results will contain only Zip archives.

You could restrict the search based on size or date. Please note that this type of search is optional. As you can see, the application will tell you this: "Size and date are looked up from the database. If the database does not contain size and date information, these options will be ignored."
You can customize the search in more ways by going to "Advanced" tab. In this example, there is a huge list of available formats. As the name suggests, this can be used for advanced searches.

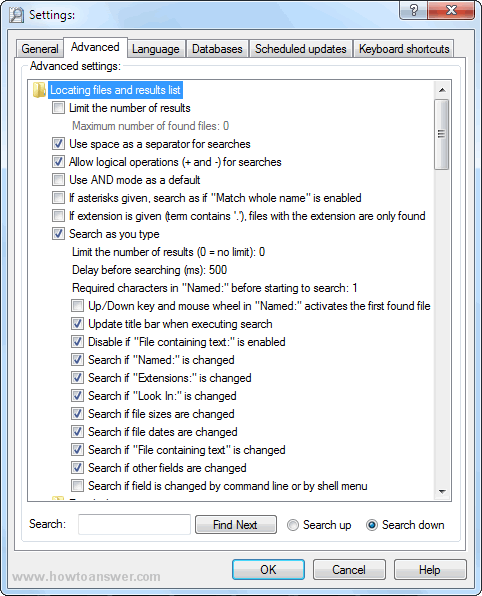
Locate32 is a friendly search application, easy to use by anyone but that doesn't mean that it's not for advanced users. To access this area, go to "Tools" then choose "Settings".

There are many options but take a look at the "Advanced" tab. All these advanced settings allows you to customize your search in many ways. This is a quick Locate32 review so I won't get in other details. There are many of them.
Sooner or later you will want to know this: adding a new database in Locate32. By default, the program will create databases and index files and folders using your PC partitions. If you want to create a new database that would include an external HDD (Hard Drive) you need to create a new database. It's easy, just go to "Databases" tab (Tools-Settings-Advanced-Databases) and click on "New" button.

A new window named "Database options" will open. You will need to add a name for your database, choose a location where to save it and to SELECT the external Hard Drive. I have highlighted all of them. When ready, click "OK".

You should see the new database added at this section: "Databases currently in use". From here you can choose to edit, remove or add another one.

Now that you've added a database, you have to update that too. Just repeat the first procedure. Go back to program interface and select "Update Databases".

Just like the first time, you will see the status of the update by looking at such messages. When the update is ready it will automatically close.
Now that the update of the new database is ready, I can search for something located on internal and external hard drives so I can test that it works. Take a look at the following image. The program found results on both partitions located on different hard drives: internal and external.

This is not a complete Locate32 review. I did not included many tricks such as: use of wildcards or text and data within files. Not to mention the advanced settings section. For more help, I would recommend you to read "Help Topics" section that can be opened from main software window. My final conclusion about Locate32: you can't find a better desktop search application for Windows.